Is your Elementor website lacking the perfect link color to match your brand or design?
Adding custom link colors is a quick and easy way to enhance your website’s appearance and make it stand out. With Elementor, you can easily customize your link colors to make them truly your own.
In this article, we’ll show you the easiest ways to add custom link text colors in Elementor, giving your website the extra edge it deserves.
Whether you prefer the default Site settings way or the custom CSS way, you can customize your links to match your brand or design. So, let’s dive in and learn how to add custom link colors easily in Elementor – the easiest way!
Table of Contents
Method 1: How to Change Global Elementor Link Color from Site Settings
Elementor has a default way to change link colors, which is through the Global Site Settings. Here’s how to do it:

Step 1: Go to Global Site Settings
First, go to your WordPress dashboard and navigate to the top left corner Elementor > Site Settings. This will take you to the Site Settings panel, where you can set your default colors.
Step 2: Select Site Colors
In the Global Site Settings panel, click on “Site Colors”. This will take you to the Site Colors section.
Step 3: Change Your Link Color
Scroll down to the “Links” section and select the color from the color picker or paste your hex code you want for your links. You can choose from the preset colors or enter a custom color code.
Once you’ve selected your color, click on “Save Changes” to save your new default link color.
Method 2: How to Change Elementor Custom Link Color Using Custom CSS Code?
If you want to change the link color for a specific section or widget, you can do so with custom CSS and target it with a class. This is particularly useful if you want to highlight the link colors in a specific section of your website, such as a blog post or a landing page.
For example, let’s say you want to highlight the link colors in your blog with a specific color.
Here’s how you can do it:
Step 1: Add a New Custom Class to Section
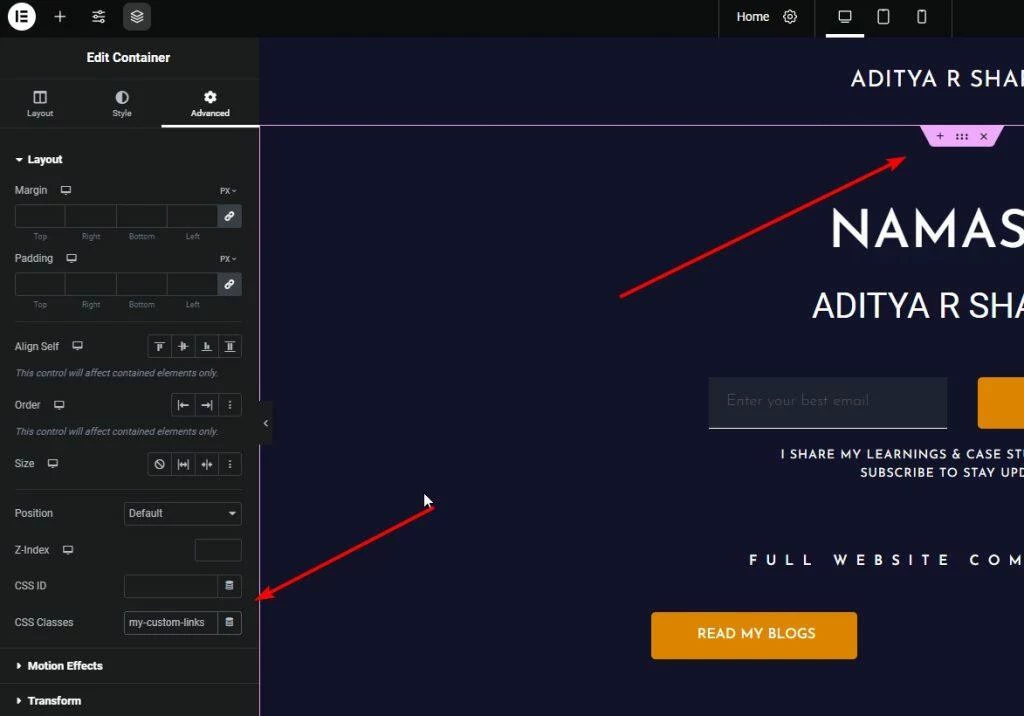
First, add a new section or widget to your Elementor page. In the section or widget settings, go to the “Advanced” tab. In the “Advanced” tab, add a new class to the “CSS Classes” field. For example, you can add “my-custom-links” as your class. Click on “Update” to save your changes.
Step 2: Go to the Theme Customizer

Go to your WordPress dashboard and navigate to Appearance > Customize. This will take you to the Customizer.
In addition to the customizer, there are other ways to add custom CSS for your link text colors in Elementor. For instance, you can add the code directly in the Elementor Page’s Custom CSS to ensure that it only affects the specific page you’ve added it to.
Alternatively, if you want the code to load on all pages of your website, you can add it to the Elementor Header or Footer section. This will ensure that the code is loaded globally on your website.
Step 3: Add the Custom CSS
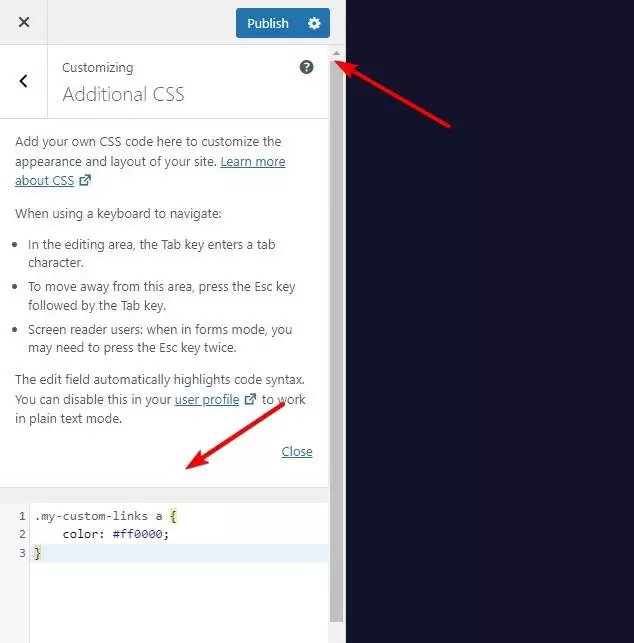
In the Customizer, click on “Additional CSS”. This will take you to the Additional CSS panel. In the Additional CSS panel, add the following code:
.my-custom-links a {
    color: #ff0000;
}
This code will change the color of link for any section with the “my-custom-links” class. You can change the color code as your wish, this way you can also add individual link color.

Step 4: Publish Your Changes
Click on “Publish” to save your changes. Your link color will now be customized for the specific section or widget you added the class to.
I share my Learnings & Case studies via email.
Subscribe to Stay Updated
Conclusion
Now you know how to add custom link colors easily in Elementor. Whether you prefer the default Global Site Settings way or the custom CSS way, you can customize your links to match your brand or design.
If you require any help with customization of Elementor, feel free to connect with me
Frequently Asked Questions
Can I change the link color for a specific page or post in Elementor?
Yes, you can change the link color for a specific page or post in Elementor by using the custom CSS way. Simply add a new class to the section or widget you want to change the link color for, and add custom CSS in the Additional CSS panel in the Customizer.
Can I add hover color effects to my custom link colors in Elementor?
Yes, you can add hover effects to your custom link colors in Elementor by using custom CSS. For example, you can add the following code to change the link color on hover:
.my-custom-links a:hover {
color: #00ff00;
}
This code will change the link color to green when the link is hovered over.
Can I add custom link colors to my Elementor header and footer?
Yes, you can add custom link colors to your Elementor header and footer by using the custom CSS way. Simply add a new class to the header or footer section or widget, and add custom CSS in the Additional CSS panel in the Customizer.
Will changing the link color affect the accessibility of my website?
Yes, changing the link color can affect the accessibility of your website. It’s important to choose a color that provides enough contrast with the background color, and to ensure that the link is still easily distinguishable from surrounding text.
Can I use a gradient for my custom link color in Elementor?
Yes, you can use a gradient for your custom link color in Elementor by using custom CSS. For example, you can add the following code to use a gradient for your link color:
.my-custom-links a {
background: linear-gradient(to right, #ff0000, #00ff00);
-webkit-background-clip: text;
-webkit-text-fill-color: transparent;
}
This code will use a gradient that goes from red to green for your link color. Just add custom class my-custom-links to the section you want to add this effect or else you can remove the class and just start with a to effect the whole Elementor website.
